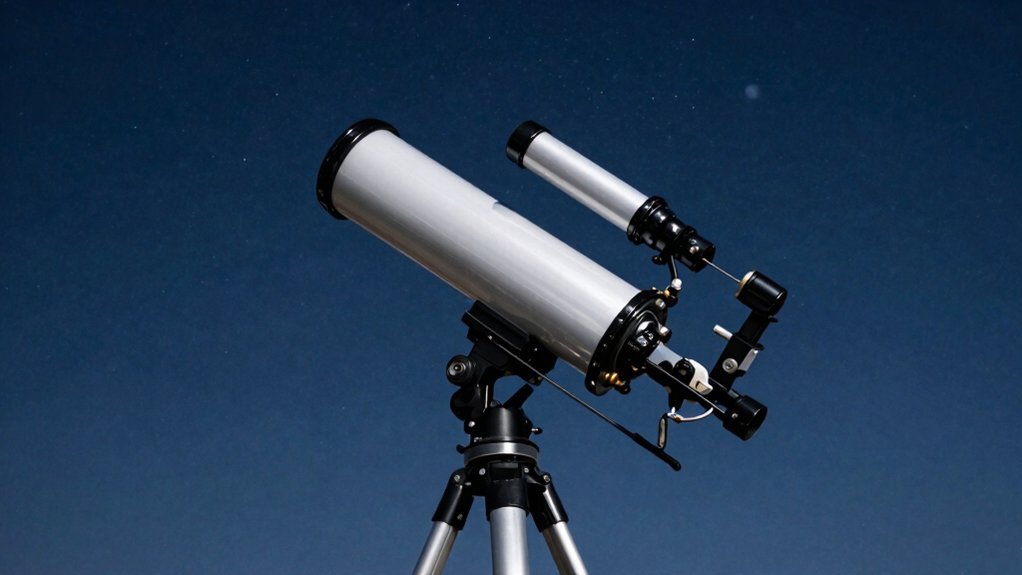
You’re confused by the jargon, but a refractor really just needs an objective lens and an eyepiece. The big front lens gathers light, while the eyepiece magnifies that image like a simple magnifying glass. Obviously, you also need a tube to block stray light and a steady mount to hold everything still. Start with a 70mm aperture for clear views without breaking the bank. Keep exploring to master every part of your new setup.
How Does a Refracting Telescope Gather Light?
Two main things happen when light hits your telescope’s front lens. First, the big glass grabs photons from distant stars instantly. Second, it bends those rays sharply toward a single focal point. You’re wondering how this actually works without mirrors involved, right?
Here’s the thing: your objective lens handles all the critical light gathering. This primary lens function refracts parallel beams so they converge tightly. A larger aperture collects more photons, making faint objects suddenly visible. Obviously, bigger glass means brighter images for your eyes to enjoy.
Now, the tube keeps everything aligned perfectly along that optical path. Without this stability, your focused image would blur into useless noise. Refractors use glass instead of mirrors to achieve this clean concentration. Remember that maintaining clean optics ensures maximum light transmission through these glass elements. Unlike reflectors which rely on mirrors, refractors utilize lens-based optics to eliminate central obstructions and provide high-contrast views. The specific curvature of the glass determines the focal length required to bring distant celestial objects into sharp focus.
Your telescope creates a bright, focused picture ready for magnification next. Ready to see how the eyepiece zooms in on that spot?
Why the Eyepiece Magnifies the Image
You’re wondering how that tiny lens at the back makes distant stars look huge, right? It acts just like a magnifying glass for the real image your objective lens already formed. Without this second lens, that image stays too small for your eye to inspect closely.
Here’s the thing: eyepiece magnification depends entirely on focal lengths. You divide the objective’s focal length by the eyepiece’s focal length to get your power. Shorter eyepieces deliver more zoom because they spread light over a larger visual angle. This setup ensures the final view appears to originate from infinity due to extended rays. While optical quality is vital, selecting the right telescope options based on your specific stargazing goals ensures you get the best performance for your budget. Different refractor designs utilize various lens configurations to minimize color fringing and improve image clarity. The optical tube assembly houses these critical lenses in precise alignment to maintain image stability during observation.
This process creates a magnified virtual image that occupies more space on your retina. Obviously, you see details clearly because the angular size increases dramatically. Your eyepiece choice controls this final view, not the telescope tube itself. Now you understand why swapping lenses changes everything instantly. Next, you need to know what aperture size actually matters for gathering enough light.
What Aperture Size Do You Need?
So, how much glass do you actually need to see clearly? You might feel stuck choosing between tiny scopes and massive lenses. Obviously, bigger apertures gather more light, revealing dimmer galaxies and sharper details.
Here’s the thing: most aperture recommendations suggest 70mm to 100mm for starters. These ideal sizes show the Moon and planets well without breaking your back. A 60mm scope works, but serious spending usually starts at 3 inches.
Now, consider that 150mm offers a sweet spot for deep-sky views. Yet, atmospheric limits often cap useful magnification around 200x anyway. Don’t buy a giant lens if you can’t carry it outside.
Your best choice balances budget, portability, and how often you’ll use it. Larger lenses cost considerably more due to manufacturing difficulties. Pick the biggest size you’ll actually deploy regularly. When comparing telescope options, factors like optics and performance play a crucial role alongside aperture size in determining the right instrument for your needs. Understanding the specific telescope types available ensures you select a design that complements your chosen aperture for optimal viewing. For instance, selecting the correct optical design is just as vital as aperture when matching a telescope to your specific viewing goals and budget.
Ready to see how that lens stays protected inside the tube?
How the Optical Tube Protects the Light Path
That long tube isn’t just a shell; it’s the guardian of your view. You might wonder why such a lengthy housing matters so much for your stargazing sessions. It blocks stray light pollution that washes out faint stars and ruins contrast.
Now, consider how this shield works. The tube keeps off-axis glare away from your precious optical clarity. By limiting unwanted side light, you see darker backgrounds and sharper planetary details. Obviously, precise alignment inside this cylinder guarantees light travels straight to your eye.
Here’s the thing: dust or bumps could easily misalign those delicate lenses without protection. The sturdy walls maintain fixed spacing between the objective lens and eyepiece perfectly. This stability lets you enjoy crisp images night after night without constant adjustments.
Your telescope needs this enclosed path to function effectively under real sky conditions. Additionally, the interior of the tube is often coated with a matte black finish to further absorb any scattered light before it reaches the eyepiece. This design ensures that internal reflections are minimized to preserve image contrast. The rigid structure also prevents air currents from disrupting the light path, which is essential for maintaining a steady image. Next, you’ll want to know exactly where that finderscope points your main scope.
Where Does the Finderscope Point the Scope?
Where exactly does that little finder aim your big scope? It points precisely where your main optical tube looks, acting as your primary aiming aid. You use its wider field of view for easier target acquisition before switching to high magnification. Obviously, it doesn’t choose a different direction once you finish your finderscope alignment correctly.
Now, imagine lining up a rifle sight; you adjust screws until crosshairs match the main eyepiece view. You center a distant telephone pole or sign during daytime to confirm both scopes agree perfectly. This process guarantees that when the finder targets an object, your main scope sees it too.
Here’s the thing: a misaligned finder sends your telescope staring at empty sky instead of your goal. Regular checks keep your pointing accuracy sharp throughout long observing sessions under dark stars. Always verify alignment with a low-power eyepiece first for best results tonight. To ensure maximum precision, you should swap to a higher magnification eyepiece and adjust the black knobs on the finder scope until the crosshair aligns perfectly with the object. Understanding how light refraction bends through these lenses clarifies why precise optical alignment is critical for clear viewing. Since refractors rely on lenses to gather light, maintaining this alignment ensures the optical axis remains consistent between the finder and the main tube for accurate targeting. Just as understanding web page costs helps buyers budget wisely for online projects, knowing the value of precise optical components ensures you invest correctly in your telescope’s performance.
How to Adjust the Focuser for Sharp Views
Turn the focuser knob gently until the blurry mess snaps into a crisp, sharp image. You’ve probably wondered why stars look like fuzzy blobs even after pointing perfectly. That’s exactly where precise focuser adjustments save your viewing session every single time.
Now, remember the eyepiece just magnifies what the objective lens already formed inside. Move it inward or outward in tiny increments until details pop clearly. Fine focusing isn’t changing magnification; it’s mechanically aligning your eye with the focal plane. Different eyepieces need different positions, so don’t assume one setting fits all. The large front glass piece responsible for gathering light is known as the objective lens, and its quality dictates the maximum resolution you can achieve.
Keep your target centered using the finderscope before making those final tweaks. A shaky mount ruins sharpness faster than bad optics ever could. Watch for edges becoming distinct and contrast improving as you turn the knob slowly. Obviously, stray light hurts clarity, so make sure your tube blocks unwanted glare effectively. Master this mechanical dance, and you’ll reveal every detail your telescope offers. Understanding how light refraction bends through the glass elements is crucial for diagnosing why an image might resist sharpening despite perfect mechanical alignment. Properly managing thermal equilibrium prevents air currents inside the tube from distorting the view even when the focus seems perfect. Next, let’s figure out which mount keeps everything steady for you.
Which Mount and Tripod Fit Your Needs?
You’ve nailed the focus, but a shaky stand still ruins those crisp views. Obviously, your mount selection dictates how smoothly you track stars across the night sky. Alt-azimuth mounts offer simplicity for casual looking, while equatorial ones handle long sessions better.
Tripod stability becomes your best friend when wind blows or hands tremble during focusing. Heavy tubes demand rigid legs that ignore uneven ground without wobbling dangerously. You need a base supporting your total gear weight, not just the bare optical tube.
Lightweight setups travel easily yet often sacrifice the rigidity required for high magnification viewing. Adjust your legs carefully to level everything before hunting for faint celestial objects. Smooth controls help you center targets without frustrating jerky movements ruining the moment.
Choose a system matching your specific observing style and typical location constraints perfectly. Now ask yourself if portability matters more than absolute steadiness for your next trip. Understanding mechanical stability ensures your chosen setup maintains precise alignment throughout extended observation periods. Proper load capacity ratings prevent the mount from sagging under the weight of your optics and accessories.
When Should You Use a Diagonal Mirror?
Why does your neck ache after minutes of stargazing? You likely stare straight up without a diagonal mirror. This simple accessory bends light ninety degrees, letting you look down comfortably. Observing comfort skyrockets when you stop craning your neck toward the zenith.
Now, consider image orientation during daytime birdwatching. A standard diagonal flips the view right-side up, though left remains reversed. You gain usable visuals for terrestrial targets while maintaining telescope stability on your mount. Obviously, Newtonians skip this part since they house internal mirrors already.
Select a 1.25-inch model for planets or a 2-inch version for wide fields. Poor quality glass dims faint stars, so choose wisely for sharp contrast. Your refractor demands this component for ergonomic, long-duration viewing sessions tonight.
Grab a quality diagonal now to transform your awkward posture into relaxed enjoyment. Ready to learn how lens caps protect that new gear?
How Lens Caps and Dew Shields Help
All right, you just secured a comfortable viewing angle, but what stops dew or dust from ruining that clear view? You need to understand lens cap benefits and dew shield advantages before your optics fog up. The cap blocks fingerprints and dust while storing your telescope, keeping coatings pristine.
Now, the dew shield acts like a hat for your lens, blocking open sky to slow cooling. By limiting exposure, it delays condensation that blurs your image during long sessions. Obviously, a shield length of 1.5 times your aperture works best for most nights.
These tools save you from wiping wet glass mid-observation. Keep the cap on until you start viewing, then attach the shield immediately. Don’t trap moisture by capping a wet lens; let it dry first. This simple routine guarantees crisp views without constant cleaning. Ready to learn what parts might fail later?
What Common Parts Break in Refractors?
A solid refractor feels indestructible until a specific part suddenly lets you down. You might assume the glass breaks first, but mechanics usually fail before optics do.
Focusers often cause your biggest headaches since grease dries out after fifteen years. Rack-and-pinion teeth wear down, creating sloppy motion that ruins your viewing sessions. These common focuser issues demand immediate attention before they strip completely.
Obviously, your objective alignment can drift if someone bumps the lens cell hard. While rare, this misalignment reduces contrast and requires professional collimation to fix. Dust or fungus on coatings also degrades performance considerably over time.
Eyepiece threads seize, and rubber eye cups crack under harsh UV exposure. Don’t ignore loose diagonals either, as they shift images unpredictably during use.
Check your moving parts regularly to prevent catastrophic failure later tonight.